
Here’s how I enhance audio quality in DaVinci Resolve’s Fairlight audio editor.
Whether I'm working on dialogues, interviews or voiceovera, I find Fairlight’s tools incredibly effective for making audio sound clear and professional.
Important reminder
Before exploring the tools, keep in mind that quality audio begins with solid recording practices. While DaVinci Resolve offers powerful audio enhancement features, it can’t perform miracles on poorly recorded sound. Strive to capture the best possible audio from the start to reduce the need for heavy correction in editing.
My step-by-step approach
To sound better, there are several essential principles that every editor, producer, and creator should consider. In this guide, I'll show you how to enhance your audio in DaVinci Resolve, exploring the different features that can significantly improve the quality of your recordings.
1.) Dialogue Processor
The Dialogue Processor offers a range of audio effects designed to enhance your recordings, including De-Rumble, De-Pop, De-Ess, Compressor, Expander and Excite. Each effect serves a unique purpose, so understanding their functions will help you choose the best adjustments for your specific audio needs.

De-Rumble
The De-Rumble effect is an audio processing tool designed to remove or reduce low-frequency rumble and unwanted bass noise from audio recordings. I use this effect to remove rumbling sounds, which are often caused by wind noise, handling noise on microphones, or vibrations from nearby machinery.
De-Pop
I use this effect in to remove strong popping noises from audio, especially in dialogue. Harsh “pop” sounds caused by plosive consonants like "p" and "b," which occur when air hits the microphone directly during speech. The De-Pop effectively minimizes or eliminates these distracting sounds, resulting in cleaner, more polished audio.
De-Esser
I use this to soften harsh “S” sounds by focusing on higher frequencies. I find that setting it to activate around 5.8/5.9 KHz helps reduce sibilance without dulling the audio too much.
Compressor: used to reduce loud parts of a recording
Expander: used to make quiet sections louder
Excite: used to enhance the high-end frequencies to make vocals crispier
When using the dialogue processor, it is important to know that you can turn on or off the effects listed above. So if you only need to remove sibilance in your audio, then just use De-esser and turn off the other tools.
Overall, this 6-in-1 audio effects tool inside DaVinci Resolve can be powerful enough to make specific adjustments to your audio.
2.) Dynamics
Another powerful tool in DaVinci is Dynamics, which functions similarly to the Dialogue Processor by offering multiple audio effects. These include an Expander, Compressor, and Limiter. While the Expander and Compressor work the same way as those in the Dialogue Processor, they are more user-friendly, with simplified controls for easier adjustments. The Limiter, on the other hand, is essential for managing audio peaks, ensuring a balanced and controlled sound.
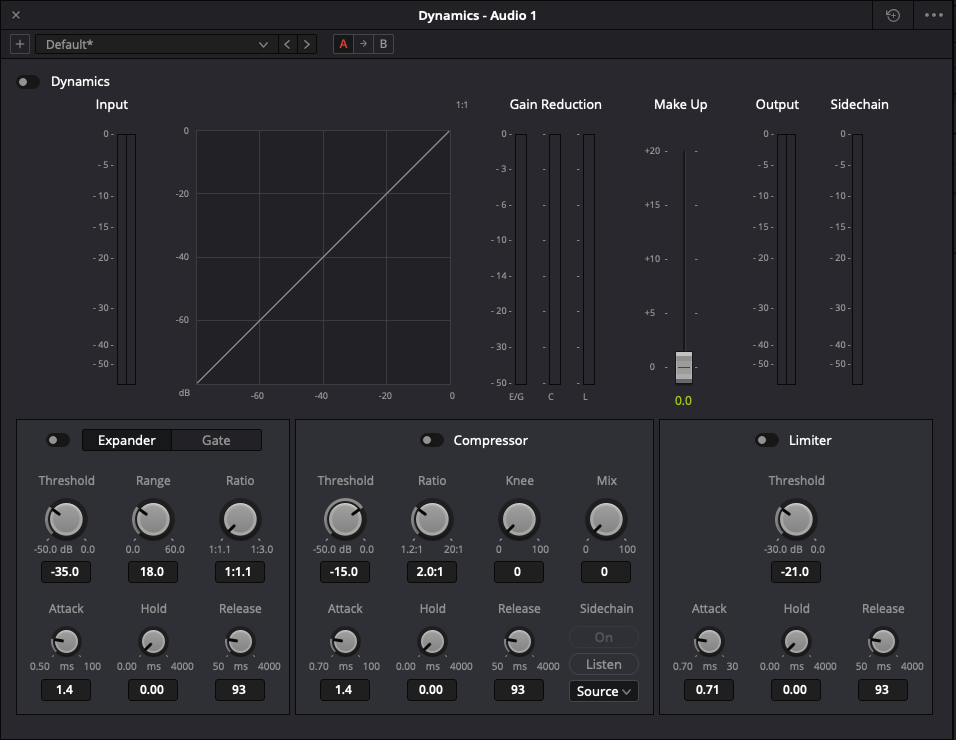
The Dynamics tool is ideal when you want to focus primarily on using three key audio effects or gain better visibility and control over various settings. Additionally, similar to the Dialogue Processor, it allows you to disable any effects you don’t need.
3.) Equalizer
The third tool on our list for improving audio in DaVinci Resolve is the Equalizer. It lets you fine-tune the balance of different frequencies in your recording and allowing you to enhance or reduce specific tones to achieve the desired sound.

Equalizers can be challenging to use, especially for beginners. However, DaVinci Resolve offers ready-made presets that make it easy to enhance your audio quality instantly.
If you have a good understanding of audio frequencies, the Equalizer is a powerful tool for enhancing your sound. It allows you to eliminate low-end rumbles, apply a high-pass filter, and effortlessly boost the bass - all within a single tool.
Conclusion
DaVinci Resolve provides a variety of tools to enhance audio quality. The three tools mentioned above can be used together or individually, depending on what needs improvement and your familiarity with each one. Effective audio editing is about making subtle refinements rather than drastic changes. Take your time to experiment and find the best approach for your project.
Check out the following informations too
➡️ 10 Basic music photography tips - Concert photography 101
➡️ The great stage pit etiquette guide for music photographers
➡️ Best earplugs for concerts, festivals, sporting & other loud events
Do you have any recommendations or personal guidelines that you find helpful?
Please feel free to comment and share your thoughts on “DaVinci Resolve - How to make audio sound better”.
If you like my work or the free stuff and want to say thank you, please use this opportunity now and
THANK YOU, very much! 🙏🏻